Git 仓库操作规范总结
分支管理策略
主分支
首先代码应该有且仅有一个主分支,项目的正式版本,都在这个主分支上发布。
Git 主分支的默认名为 master,但是由于 master 一词打擦边球,所以建议使用 main 作为默认分支名称,从 Git 2.28 开始,可以通过设置 init.defaultBranch 修改默认分支的名称
git config --global init.defaultBranch main开发分支
日常开发的分支,每次发布新版本时,合并到 main 分支,推荐命名 dev。
创建 dev 分支
git checkout -b dev main合并到 main 分支
# 切换到 main 分支
git checkout main
# 对 dev 分支进行合并
git merge --no-ff dev
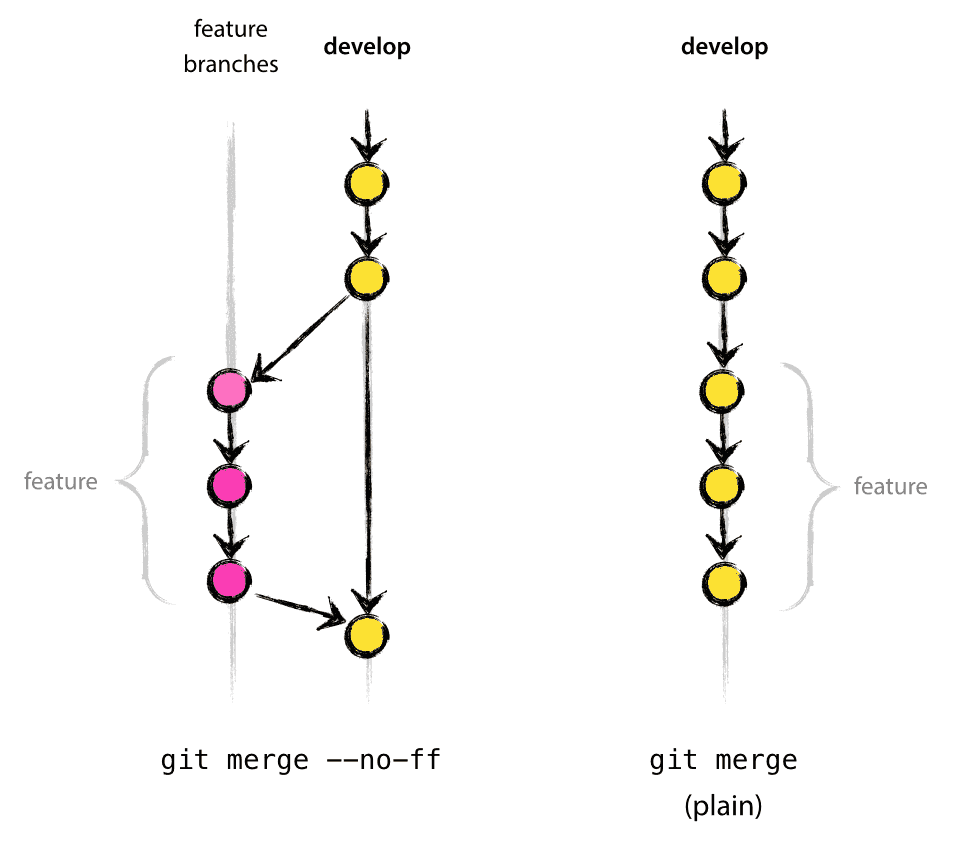
关于 --no-ff 参数:默认情况下,Git 执行“快进式合并”(fast-farward merge),会直接将 main 分支指向 dev 分支。使用 --no-ff 参数后,会执行正常合并,在 main 分支上生成一个新节点。为了能够清晰的看到合并前的结构,尽量采用这种方式。

如上图,在后一种情况下,无法从 Git 提交历史中看到合并之前新功能分支的所做的改动历史。
功能分支
开发某个新功能时创建该分支,命名方式可以自定义,推荐以 feat-* 开头的方式命名。默认情况下,功能分支通常只存放在开发者仓库中,不应该存放在 origin(远程仓库)
创建功能分支
# 从 dev 分支创建 myfeature 分支并切换至该分支
git checkout -b myfeature dev
完成新功能后合并回 dev 分支
# 切换到 dev 分支
$ git checkout dev
# 将 myfeature 分支合并到 dev 分支
$ git merge --no-ff myfeature

# 删除 myfeature 分支
$ git branch -d myfeature
# 同步到远程仓库
$ git push origin dev
预发布分支
用于发布新版本的测试的分支,发布后需要合并回 dev、main 分支,名称以 release-* 开头,通常在新版本发布后会删除该分支
# 创建预发布分支
git checkout -b release-1.2 dev

# 完成预发布分支后合并回 main 分支
$ git checkout main
$ git merge --no-ff release-1.2

# 更新版本
$ git tag -a 1.2

# 合并回 dev 分支
git checkout dev
git merge --no-ff release-1.2

# 删除预发布分支
git branch -d release-1.2
修补分支
用于修复某些 bug ,命名以 hotfix-* 开头,最终要合并回 dev、main 分支
# 创建一个修补分支
git checkout -b hotfix-1.2.1 main

# 修复完成后合并到 main 分支
git checkout main
git merge --no-ff hotfix-1.2.1

# 更新版本
git tag -a 1.2.1

# 再合并到 dev 分支
git checkout dev
git merge --no-ff hotfix-1.2.1

# 最后删除修补分支
git branch -d hotfix-1.2.1
提交 commit
修改完成后,就可以提交当前 commit 了
git add .      # --all 的缩写,表示保存所有变化(包括新建、修改和删除)
git status -sb # -s 表示显示简略的文件状态信息,-b 表示显示改动分支
git commit -v  # --verbose 缩写,表示列出 diff 结果(diff:用来比较两个文本文件的差异)

# 一行内容展示每次的 commit 信息
git log --oneline
git status 示例
$ git status
On branch master
Your branch is up to date with 'origin/master'.

Changes not staged for commit:
  (use "git add/rm <file>..." to update what will be committed)
  (use "git checkout -- <file>..." to discard changes in working directory)

        deleted:    docs/posts/git-commit-specification.md
        deleted:    docs/posts/git-use-standard-process.md

Untracked files:
  (use "git add <file>..." to include in what will be committed)

        docs/posts/commit-message-specification.md
        docs/posts/git-usage-specification.md

$ git status -s
 D docs/posts/git-commit-specification.md
 D docs/posts/git-use-standard-process.md
?? docs/posts/commit-message-specification.md
?? docs/posts/git-usage-specification.md

$ git status -b
On branch master
Your branch is up to date with 'origin/master'.

Changes not staged for commit:
  (use "git add/rm <file>..." to update what will be committed)
  (use "git checkout -- <file>..." to discard changes in working directory)

        deleted:    docs/posts/git-commit-specification.md
        deleted:    docs/posts/git-use-standard-process.md

Untracked files:
  (use "git add <file>..." to include in what will be committed)

        docs/posts/commit-message-specification.md
        docs/posts/git-usage-specification.md

no changes added to commit (use "git add" and/or "git commit -a")

$ git status -sb
## master...origin/master
 D docs/posts/git-commit-specification.md
 D docs/posts/git-use-standard-process.md
?? docs/posts/commit-message-specification.md
?? docs/posts/git-usage-specification.md
撰写提交信息
这一步可以参考:Commit message 规范,尽量提交规范化的信息。
与主干同步
分支开发过程中,经常需要与主干仓库保持同步
git fetch origin
git rebase origin/master
合并 commit
分支开发完成后,很可能有一堆 commit,但是合并到主干的时候,往往希望只有一个(或最多两三个)commit,这样不仅清晰,也容易管理。
怎样将多个 commit 合并呢?这就要用到 git rebase 命令(变基)。
git rebase -i origin/mastergit rebase 命令的 i 参数表示互动(interactive),这时 git 会打开一个互动界面,进行下一步操作。
下面采用Tute Costa的例子,来解释怎么合并commit。
pick 07c5abd Introduce OpenPGP and teach basic usage
pick de9b1eb Fix PostChecker::Post#urls
pick 3e7ee36 Hey kids, stop all the highlighting
pick fa20af3 git interactive rebase, squash, amend

# Rebase 8db7e8b..fa20af3 onto 8db7e8b
#
# Commands:
#  p, pick = use commit
#  r, reword = use commit, but edit the commit message
#  e, edit = use commit, but stop for amending
#  s, squash = use commit, but meld into previous commit
#  f, fixup = like "squash", but discard this commit's log message
#  x, exec = run command (the rest of the line) using shell
#
# These lines can be re-ordered; they are executed from top to bottom.
#
# If you remove a line here THAT COMMIT WILL BE LOST.
#
# However, if you remove everything, the rebase will be aborted.
#
# Note that empty commits are commented out
上面的互动界面,先列出当前分支最新的4个 commit(越下面越新)。每个 commit 前面有一个操作命令,默认是 pick,表示该行 commit 被选中,要进行 rebase 操作。
4个 commit 的下面是一大堆注释,列出可以使用的命令。
- pick:正常选中
- reword:选中,并且修改提交信息;
- edit:选中,rebase 时会暂停,允许你修改这个commit(参考这里)
- squash:选中,会将当前 commit 与上一个 commit 合并
- fixup:与squash相同,但不会保存当前commit的提交信息
- exec:执行其他shell命令
上面这6个命令当中,squash 和 fixup 可以用来合并 commit。先把需要合并的 commit 前面的动词,改成squash(或者s)。
pick 07c5abd Introduce OpenPGP and teach basic usage
s de9b1eb Fix PostChecker::Post#urls
s 3e7ee36 Hey kids, stop all the highlighting
pick fa20af3 git interactive rebase, squash, amend
这样一改,执行后,当前分支只会剩下两个 commit。第二行和第三行的 commit,都会合并到第一行的 commit。提交信息会同时包含,这三个 commit 的提交信息。
# This is a combination of 3 commits.
# The first commit's message is:
Introduce OpenPGP and teach basic usage

# This is the 2nd commit message:
Fix PostChecker::Post#urls

# This is the 3rd commit message:
Hey kids, stop all the highlighting
如果将第三行的 squash 命令改成 fixup 命令。
pick 07c5abd Introduce OpenPGP and teach basic usage
s de9b1eb Fix PostChecker::Post#urls
f 3e7ee36 Hey kids, stop all the highlighting
pick fa20af3 git interactive rebase, squash, amend
运行结果相同,还是会生成两个 commit,第二行和第三行的 commit,都合并到第一行的 commit。但是,新的提交信息里面,第三行 commit 的提交信息,会被注释掉。
# This is a combination of 3 commits.
# The first commit's message is:
Introduce OpenPGP and teach basic usage

# This is the 2nd commit message:
Fix PostChecker::Post#urls

# This is the 3rd commit message:
# Hey kids, stop all the highlighting
Pony Foo提出另外一种合并 commit 的简便方法,就是先撤销过去5个 commit,然后再建一个新的。
git reset HEAD~5
git add .
git commit -am "Here's the bug fix that closes #28"
git push --force
推送到远程仓库
合并 commit 后,就可以推送当前分支到远程仓库了
git push --force origin myfeatureforce 参数,因为 rebase 以后,分支历史改变了,跟远程分支不一定兼容,有可能要强行推送